Friday, April 4, 2014

Not really a link post

Here are a few fun links anyway.

Check out HelloGiggles' 10 Female Celebrities Who Have Amazing Views on Body Image.  I think there are so many well known female figures for girls and women to look up to now.  I don't feel like I had that many choices when I was in high school and, really, that wasn't too long ago.  Maybe they just didn't speak out as often or maybe there were fewer places willing to give them the opportunity to do so, but it makes me feel better for the younger generations.  They will have a lot of hard stuff to deal with, hopefully hearing what some of these women have to say will help.


Another awesome quote from one of the ladies featured in the above 10, Kate Winslet, popped up on my newsfeed about a month ago.  I love what Kate Winslet and the author, Kacy Faulconer, had to say on the subject of motherhood and I think it extends to all women.  Here's my favorite part:

"And then Kate Winslet issued the most perfect statement about motherhood. She says, “There’s something really empowering about going, ‘Hell, I can do this! I can do this all!’ That’s the wonderful thing about mothers, you can because you must, and you just DO.”

I don’t have a star on the Walk of Fame, and it’s not just me being modest when I say my chances of winning an Oscar® are zero. But I have felt empowered through mothering. Going through it and just doing it (because, like Kate says, you must) is empowering. You gain confidence and learn that you can do it. I’m not an expert on motherhood, but I’m surviving it and that is a triumph."

This is not an awful thing to be reminded of after a day of battling children.  You do what you do because you must and you can. 

Finally, this article from the director of Frozen, Jennifer Lee. It reminds me a little of the question Joss Whedon has stated he gets from so many people about why he writes strong female characters.  Why are people still asking what it's like to be a female director?  The answer is obviously that it's just the same as being a male director.  It's literally the same job.  Jennifer points out that the differences come when they leave the story room and walk the red carpet.  It's an interesting insight.  Also, I'm really glad I don't have to ever walk a red carpet.  

Wednesday, April 2, 2014

Tutorial: Painting on Burlap

I have this habit of seeing something I like online or at a store and instead of buying it, I think "I'll just make that myself!  It'll be easier and cheaper!"  It's usually not easier or cheaper (why do I never consider the cost of my own TIME?), but sometimes it is fun and I end up with a fun gift for someone I like.  Or my mom because she loves everything I make.

This time I set my sights on a burlap wall hanging.  As with most things nowadays, Pinterest is to blame.  I sat down and finished the painting in about half an hour, and it only took that long because I got distracted several times by a rerun of Sherlock.  So, my first tip is to pick a show that is less distracting.

Here's what you need:
Burlap, fabric paint, a sponge brush, and stencils.  This was the pack of stencils that was on sale.  Also, the cheapest sponge brush.  Having dealt with both of them, I would suggest individual letter stencils and a flat, round sponge brush instead of what is pictured.  The paint worked wonderfully.

At this point I improvised because I realized that burlap has holes in it.  I also didn't consider that burlap frays (like insanely).  After I cut the piece out that I wanted to use, I cleaned up all the lovely, tiny pieces and used painters tape to attach the burlap to the table (so it wouldn't move while I painted).  I added a piece of cardboard underneath the burlap and marked the corners so my table wouldn't get marks if the paint bled through. Here's my extremely impromptu and ghetto set up:

The cardboard and corner markers were a great idea, and in this picture it looks like it was super helpful, but in real life I couldn't see any of it so I ended up just guessing anyway.

I painted my chosen phrase (suggested by Megan).  Because my stencils were on one sheet, I kept a damp cloth handy and wiped the stencil clean after each letter.  I also eyeballed all of it, so spacing and straight lines are "abstract" (which is a creative way of saying not even and not straight, but good enough to hang it on a wall).  I started with a beige color and it turned out pretty good:


I wanted it to have a little pop of color so I outlined "fierce" in gold with a small paint brush.


Fast forward six months and I was on to the next phase of this project.  This lovely piece of burlap sat on my desk, waiting to be framed in some way, for six months.  I occasionally picked it up to try to figure out how to finish it and eventually chose to use an embroidery hoop I inherited (with about 20 others in various sizes) from my Grandmother. While I liked the hoop, it was completely unfinished.  I decided to complete the look with some yarn (I also had this on hand) wrapped around the outside of the hoop (the one with the screw on it).  This time I watched CSI while I wrapped and wrapped and wrapped, which requires very little concentration and was not distracting at all.

Here's a close up of the finished look of the hoop:


It made a huge difference and I liked the look of the brown yarn with the burlap.  This would also be another opportunity to add a pop of color if you wanted something brighter.  I put everything together and trimmed around the hoop, leaving about two inches of burlap.  Then I folded the edges in and folded it in again (to make sure none of the frayed edges were exposed) and hot glued it to the inside hoop all the way around.

This is the best looking part of this process, as I got more and more concerned with burning my fingertips on hot glue and less and less concerned with how the back of this would look when no one would ever see the back of it.  Priorities.

And here's the finished product!


It's not perfect, but it was simple and quick (if you take out the distractions and six months of indecisiveness on my part). And now I have a bunch of burlap and plenty of fabric paint that, if we are being completely honest, will probably sit on a shelf in my closet for the foreseeable future. 

Monday, March 31, 2014

Perspective

I remember my wedding day, nearly eight years ago, pretty clearly. Becoming engaged, registering, picking a dress, showing off my wedding ring (with nary a scratch), and then finally marrying the man of my dreams. It was amazing.
(Moments after we were married...
 Right before we realized that we had no clue what we'd gotten ourselves into)

I also remember thinking to myself how sad I would be when it was all over. And there was nothing left in life to look forward to. Except maybe having the occasional baby now and then. But that was it. I wondered if my friends and relatives who had married years before me felt envious of the beautiful bride and groom, as we danced together, lost in each others eyes. 

I was an idiot, per usual. 

Recently, my youngest (and onlyest) sister, Megan, married the love of her life, and they are living happily ever after. Did I feel jealously on the day of her wedding as I watched her and my handsome new brother-in-law embark on their new romance? In that moment, did I wish I could turn back the clock to my own happiest-day-of-my-life?
(Moments after Megan and Caleb were married...
Right before they realized marriage was no cake walk.)

Quite the opposite, actually.

While memories of my wedding day are warm and happy, being a newlywed was no picnic. For starters, we didn't have jobs, a place to live, or any money whatsoever. I don't know what we were thinking, getting married. My new husband was about to start student teaching in Las Vegas, a place where we had only ever visited in passing. We didn't know anybody but each other (and let's face it, we barely knew each other!) and we were young and stupid.

It was terrifying and lonely, trying to find our place in the world. Through what could only be described as divine intervention, we somehow survived the first few months on the generosity of friends and family who had given us money and gift cards. After the longest few months of my life, I finally got a job, though I still didn't know a soul or have a single friend, aside from my husband. After his student teaching it took him another three months to find a job. I wondered if we'd ever feel like we were on solid ground.

It wasn't too long ago that I found myself driving around in the small suburban neighborhood in Las Vegas that we started our life together. I blame my pregnancy hormones, but I started to cry as I thought about the young newlyweds beginning life with nothing but each other, and the struggles we were faced with. Of course we made it through those first terrifying year, and like the saying goes: what doesn't kill you makes you stronger. Those struggles bound us together as a couple and strengthened us both individually and as a family, but I hardly ever look back, and I'm grateful to have lots of ground between us and our beautiful wedding day.

As my sister has approached me multiple times with her own newlywed struggles, as she and her husband attempt to find footing and make sense of life as adults, and as a family, I can offer no other wisdom, except: just keep going. It gets better. Nobody can take away the struggles for you, you just have to work through them. Life's challenges are meant to change us, and in my experience, change never happens without at least a little pain and heartache.

Now I realize the value of experience. That when we look back on life we'll note the highlights of course, but we'll also learn to marvel in the beauty of the ordinary moments that taught us how to be, and who to be. I look forward to partaking in the wisdom and experience that my parents and grandparents have lived and earned.

Perspective is a gift that you earn with your blood, sweat, and tears. Embrace it, and be grateful for what you've been given, and never look back. Onward, always onward. 

Friday, March 28, 2014

Truths Learned from Harry Potter

You may or may not have heard of a little book series called Harry Potter. Oh, you have? Great. To celebrate my own relationship with the boy who lived, which began at the tender age of twelve way back in 1998, I've complied a list of truths I've learned from the wizarding world.

At first glance, Harry Potter is the story of a lonely, unloved boy whose world is turned upside down upon discovering he is a wizard (and a thumpen’ good one at that) when he receives an acceptance letter to Hogwarts, a prominent wizard academy. With the help of his friends, his mentor Dumbledore, and a lot of magic, Harry fights against the evil that killed his parents, and terrorizes the wizarding world.

But Harry Potter is more than just an epic tale of good and evil. There are some serious life lessons that even us muggles can take away and apply to our everyday lives.


Love is magic: Sure it’s cheesy, but this is one of the central themes of the series. Harry’s life was saved and subsequently protected when his mother sacrifices her life for his. Harry’s capacity for love proved to be a powerful weapon and one could argue that Voldermort’s apathy was his undoing. When we really sit down and consider the most important things in our life, we realize that our greatest treasures are those we love, and those who love us back. Love motivates us to protect, survive, thrive, surrender, and everything else imaginable.  

You can’t make Snape snap judgments: Severus Snape was an unlikely hero, and a fine example of how we should never judge a book by its greasy, hooked nose cover. Sure, he was never a lovable guy, but when his back story was finally revealed we all kind of felt guilty for hating him so vehemently for seven books. When we come to know the heart of the people around us, we may come to realize our criticisms are harsh and unfounded.


"Happiness can be found, even in the darkest of times, if one only remembers to turn on the light." This gem of a quote comes from none other than movie version Albus Dumbledore. Throughout the series, our heroes and heroines are faced with unimaginable hardships, but they never cease to find opportunities to laugh and find joy with each other. Sometimes we fail to realize that we can have our own happiness if we just chose to recognize it.  

“To thine own self be true.” No, that’s not Rowling, it's Shakespeare. But it’s applicable. Sure, we were all frustrated through most of the 870 pages of Order of the Phoenix when almost everyone rejected Harry’s proclamation that Voldemort had returned, but he never wavered from what he knew to be true.  Not even when he was forced to write “I must not tell lies” with a magical quill and parchment which carved the words into the back of his hand. There's an old saying that states, “Right is right even if no one is doing it; wrong is wrong even if everyone is doing it.” Be true to your beliefs, and you won’t regret it.

“It is our choices that show what we truly are, far more than our abilities.” This is from book Dumbledore and I agree wholeheartedly. Although there are things that happen to us, beyond our control, our everyday choices be it action or attitude, reveal the quality of our character. Sure, Voldemort was one of the most skilled wizards of all time, but the atrocities he committed were far more telling of who he was than his abilities. The same is true for each of us, and when our choices (our actions, our words) reveal our hearts. I love how Sirius puts it: “If you want to know what a man's like, take a good look at how he treats his inferiors, not his equals."


"Just because you've got the emotional range of a teaspoon doesn't mean we all have." I add this for my own personal pleasure, because at times I feel like I am Hermione, in a world full of Rons. Being sensitive and empathetic to those around us creates harmony in our relationships. 


What are some of the truths you've learned while reading Harry Potter?

Wednesday, March 26, 2014

Toddler Dress From Daddy's Shirt

When your wish list includes things like a car with more than two doors, being able to pay for a second baby in a few months, and eventually being able to afford a down payment on a house, you tend to find lots of creative ways to cut your budget. This month, I decided that before I spent $30 on an Easter dress for my toddler (because Easter dresses are obviously a need, but not one that I want to spend $30 on this year) I would finally try to turn one of my husband's old dress shirts that I rescued from the DI bag (DI is the Utah version of Goodwill) into a dress. I'd pinned about a thousand tutorials for it, but I narrowed it down to the one that seemed most comprehensive (see below). I went to the fabric store to pick up a little fabric for the waistband and some 1/4" elastic and spent about $5 on the stuff for what I hoped would be two dresses, plus extra for a coordinating doll for her Easter basket, because I'm ridiculous like that. 


For this project you will need:

  • 1 men's dress shirt
  • 1 package 1/4" elastic
  • Some coordinating fabric for the waistband, if desired (I needed two squares that were 5" by 19" for this 2T sized dress)
  • Sewing machine
  • Thread
  • Peasant dress pattern (see below)
  • Safety pin for threading elastic


Here's what I learned in my first attempt using this tutorial: I do not understand enough about fitting a dress to whip up my own pattern as this talented lady suggests. Either I picked the wrong dress to use as a pattern or I cut too much off when I was trying to even it up or I haven't ever actually made a dress before and had no idea what a pattern should look like. (That last one, probably.) In any case, when I had put together enough of the dress to try it on my little one, it was so tight in the arms and chest that I couldn't actually get it back off her without cutting it off, and I didn't know enough about fitting things to know how to add in some fabric so it would fit. So. Dress #1, scrapped before I'd done more than unpick the pocket of the shirt, cut it out, sew up the neck and sew down the sides.

See the sleeves cutting into her arms and the front of the dress puckering? Not cozy.


I didn't want to spend time making a second non-fitting dress, so I did a search for a peasant dress pattern and found this free pattern with accompanying tutorial, which looked similar to what I had been trying to make, but like the person who made it actually knew something about fitting a dress to a little girl (unlike me).  I used the 2T/3T version of the pattern to cut out the back of the dress, then laid it out on the front so I wouldn't have to figure out how to make sure the buttoned up front would be even (since this pattern wasn't actually made to go with a dress shirt.) Not only did this version fit, but it was a million times easier to sew up the neck, which had been miserable in my first attempt. (I was yelling, "HOW DO YOU IRON DOWN A CIRCLE??" for most of the first attempt, then just gave up and went for it in a bunchy mess.) This one used all straight lines for the neckline (which is genius, since it all curves when you stick the elastic in anyway), and so was really easy to iron down and sew up a casing for the elastic. (In case you're wondering, I had never in my life sewn a casing for elastic. Now I have done 5 for this dress, so I'm feeling confident.)

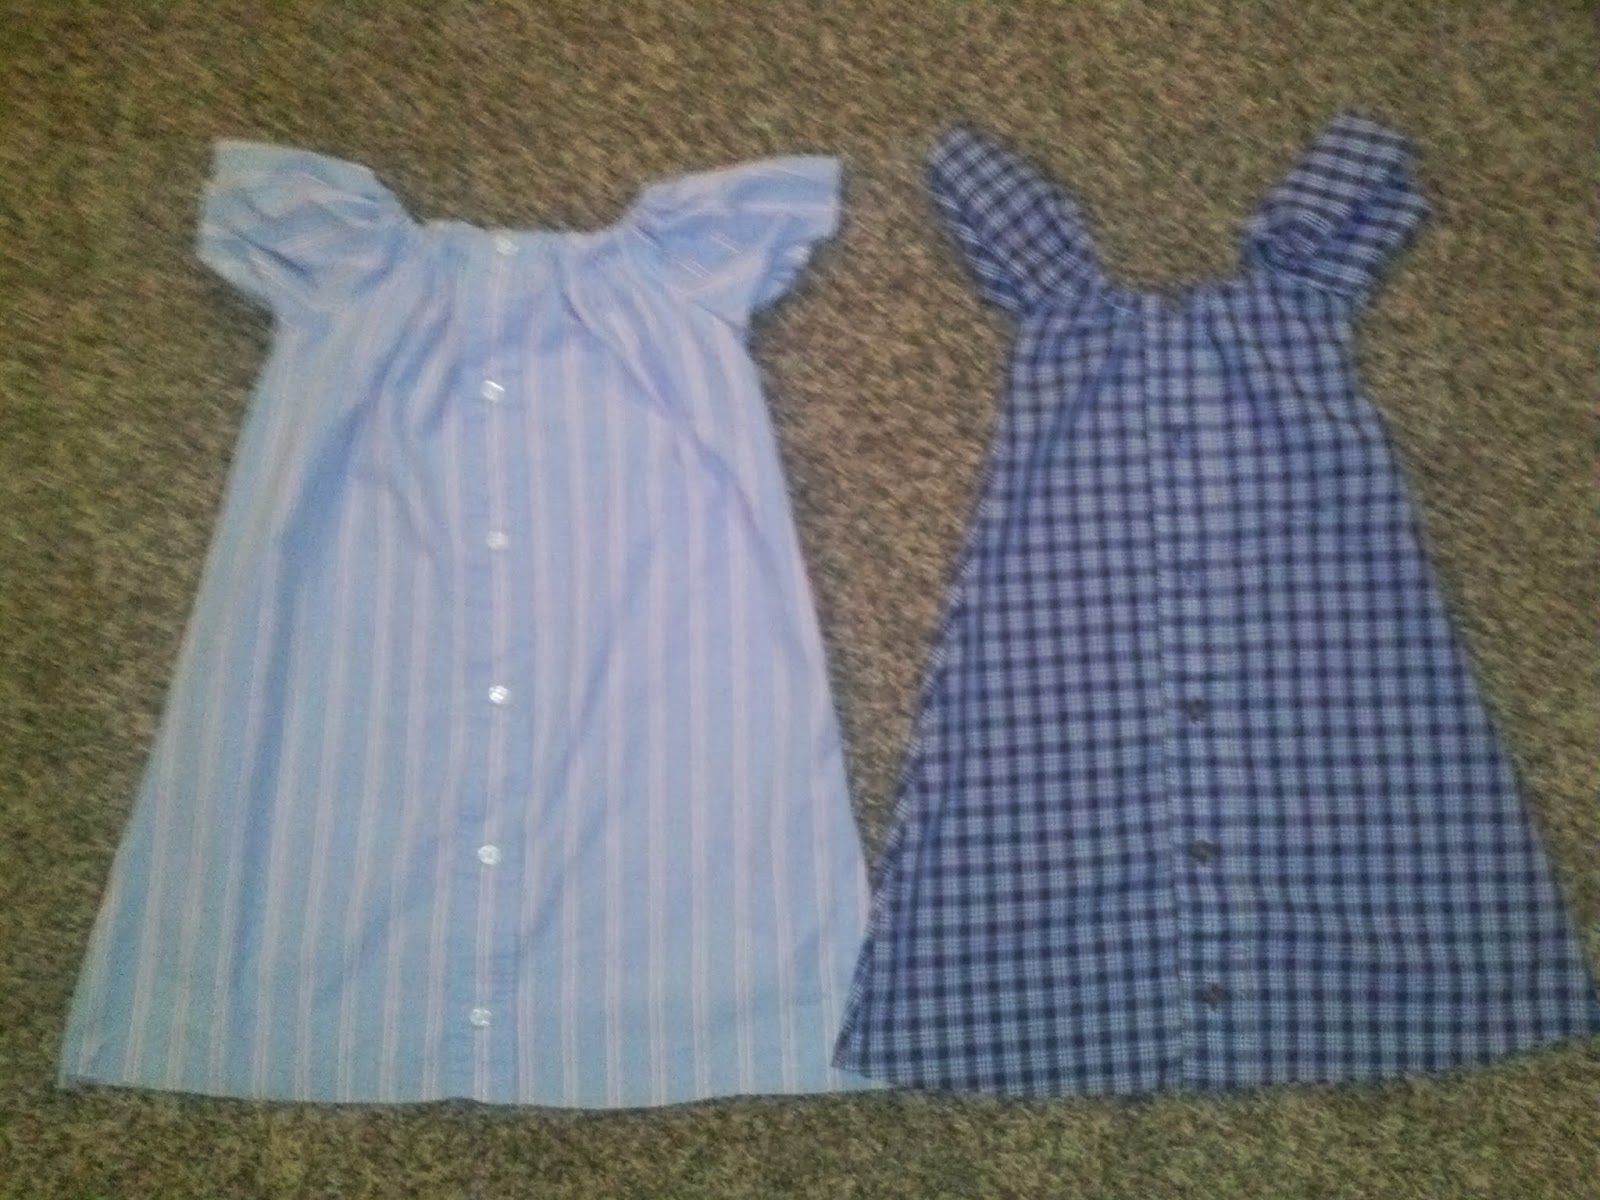
Note the difference between the two dresses, particularly in the armpit area.

 The second dress was so comfy it inspired lots of dancing.

This is my model at her least cooperative.

When the dress was hemmed and had elastic in the neck and sleeves, I was tempted to stop. But the dress had been a little more flowy than I wanted it to be when I tried it on CB pre-hemming, so I decided to go back to the first tutorial and make the waistband. I was a little afraid of it, but taking it one step at a time I found it was mostly straight lines. The biggest hiccup was realizing that I had started sewing the front of the dress to the back of the dress while I was sewing the waistband to the dress (it wouldn't be a Megan project if I didn't spend about half of my time with a seam ripper in my hand) and having to unpick a couple of inches. I placed the waistband higher than the original tutorial did, because the dress had been SO flowy when I tried it on her that I was afraid that it would be a balloon above the waistband when I put it on her. This way it just has a really full skirt, which is excellent for dancing. I used one of her other dresses as a guide for placement, and I think it looks pretty cute.

I haven't decided whether the boots are the right shoes for this, but I have some time before Easter.


She decided she needed to do butterfly fingers at me

Dance!

Next up: using the scraps to try to make that matching doll! Wish me luck!